Plying is Blending

2
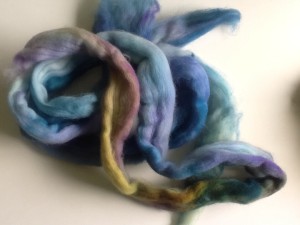
Malabrigo Nube roving Indiecita colorway

Malabrigo Nube roving Indiecita colorway

During my candy-dyeing experiment, I made roving that I was pleased with, but once I’d spun it and plied it with itself, I didn’t like the resulting yarn. I couldn’t find anything on the interwebs about how color changes through plying the same colorway. There are numerous examples of plying with neutrals, and there’s this nice Knitty article about how color changes when drafting vs. plying. So this experiment is to try and sort out how color changes through plying within the same colorway.

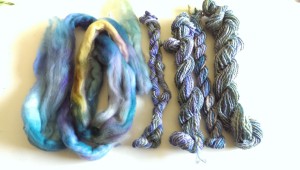
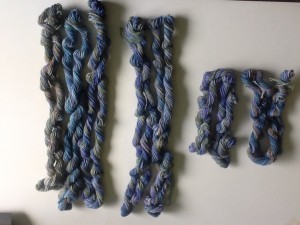
Here’s my singles laid out for plying: (from left to right) a single, chain-ply three-ply, two-ply, and three-ply.

Singles for plying

Singles for plying

Here they are plied:

Roving, single, two-ply, chain-ply three-ply, three-ply

Roving, single, two-ply, chain-ply three-ply, three-ply

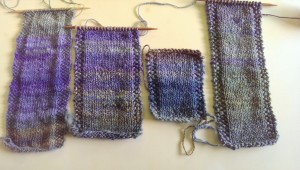
The three-ply appears obviously different. But the proof is in the pudding (or as Rachel says, the proof of the pudding is in the tasting), so I did some swatching:

Single ply yarn

Single ply yarn

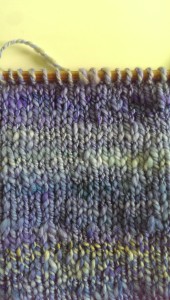
I didn’t really enjoy spinning this roving because it was a bit felted and didn’t draft very well. This resulted in a slubby single, but knit up I like the texture the slubs add. The colors and striping are the same as the roving. So if I like how it looks as a single, any plying is going to modify the colors and texture.

Two-ply

Two-ply

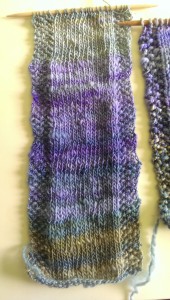
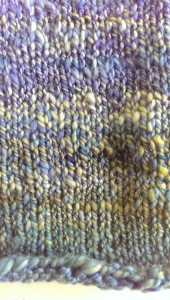
This swatch ended up being the most dynamic, color-wise. The areas of high contrast (the yellow bits) give it a marled look. Depending on the project, this could add a great deal of interest, or just make it busy. There is some color striping but it’s pretty random. The areas of low contrast, with blues plied with each other, are less vibrant than the same color in the single.

Two-ply close-up: muted blues

Two-ply close-up: muted blues

Two-ply close-up: marled yellows

Two-ply close-up: marled yellows

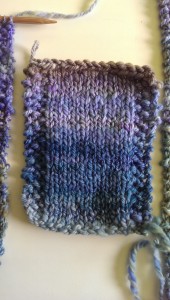
The chain-plied three-ply I expected to maintain the striping of the single swatch, just with thicker yarn, but the plying softened the color changes, and actually muted the colors:

Chain-ply three-ply

Chain-ply three-ply

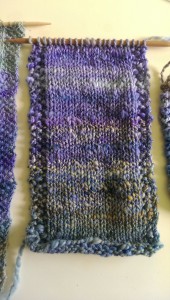
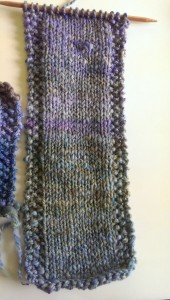
I picked the three most contrasting singles for the three-ply to try and get the maximum color variation:

Three-ply

Three-ply

The color changes have been blended out, so while there are areas of different color, the overall effect is a very gradual shift. Except for one spot where all the slubs lined up, the slubbiness is gone too. I have an automotive background, so this really reminds me of a three-phase alternator, so made to cut down on the low-spots in alternating current and provide a smooth, constant flow:

It's all about the math!

It’s all about the math!

So: when plying with the same colorway, the ply is going to change the color. A two-ply will only have half of each each single, a three-ply will only show a third of each single. I definitely should have swatched the single I’d spun from my candy-dyed roving to see if I liked it as-is. Swatch early, swatch often!
image

Turning handwoven fabric into a garment

12
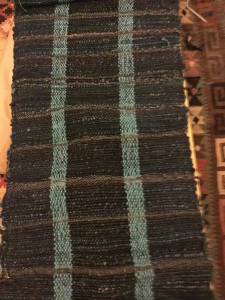
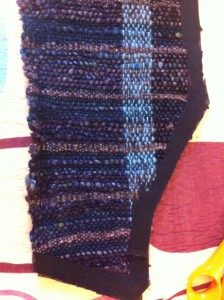
Handwoven awaiting transformation

Handwoven awaiting transformation

Rigid heddle looms may not be fancy or complicated, but do not be deceived. You’re not going to weave acres of jacquard, but don’t think placemats, table runners, scarves and hand towels are your only options on a rigid heddle loom.

Two years ago when I bought my little loom I had no idea that with some experimentation, practice and patience I’d be able to make a garment from fabric I’d created. For one thing, the idea of cutting my handwoven cloth terrified me. Also as relatively inexperienced seamstress, I wasn’t confident I could create a wearable garment.

I took the small amount of fabric I’d woven on a 20″ (50 cm) Ashford Knitter’s Loom up to Clacton-on-Sea for a lesson in sewing with handwoven with Sarah Howard. Sarah, along with Elisabeth Kendrick, is the author of Get Weaving, which I blogged about earlier this year.

Sarah helped me find a pattern that would work with the 175cm of fabric I had. We used a commercial paper pattern to get an idea of size and shape and then made some modifications for fit and the fabric.

The next step was to make a paper pattern to use to then sew up a calico to see how the garment looked. I used some denim for the calico. It allowed me to see where changes were required (in the armpits!). Once that was done, I went a way with instructions to test out the pattern on store-bought fabric. Sarah says it’s important to do a trial run before diving into your handwoven. Lots of issues can be sorted out on the sample piece. For example, I found I needed to change the shape of the side pieces slightly. Making a sample made me think about bias binding and lining too.

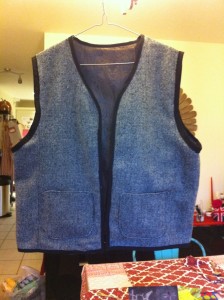
sample garment

sample garment

My sample looked pretty good, but I realised I would have to do the pockets a bit differently on the final piece–ie with biased binding and the fabric backed by iron-on woven interfacing. I also decided that gold/black lining would not look good with the handwoven and went for a solid blue silk.

Here’s a couple things to keep in mind when you’re placing your pattern on your handwoven:

– Make sure all the pieces fit. Measure the length of fabric without the fringe.

– Think about the best use of your fabric’s selvedges and hemmed ends to reduce the potential for fraying and binding.

– Make a note of the direction of warp and weft in your fabric. How does that influence how you place your pattern on your fabric? You probably want all your pieces going with the warp.

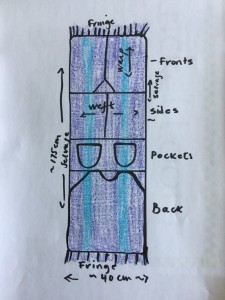
My layout looked like this:

layout

layout

I was careful to place the pockets to match up with the stripes on the two front pieces.

The next step was to cut out the pieces.Once I did, I carefully applied strips of iron-on woven interfacing to the fabric to prevent fraying. Then I zig-zag stitched over that.

I sewed together the fabric pieces as well as the lining. I didn’t sew in the lining, but bound the piece together all at once with bias-binding tape. I made it myself, which wasn’t difficult, but it was time consuming. However, store-bought bias tape is pretty poor so I do recommend taking the time to make it yourself.

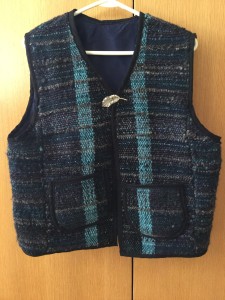
Et voila! Garment!

finished garment!

finished garment!

A few things to keep in mind when sewing with handwoven.

– Remember your woven fabric may be quite thick. How is that going to impact your seams? Will your garment work well with chunky seams?

– Use iron-on woven interface to prevent fraying. It also makes it easier to sew.

– Go slow! Once you machine sew handwoven fabric, it’s really hard if not impossible to pick out without destroying the fabric.

– Handwoven is stretchy. Think about how that might cause difficulties when sewing up or when putting in a lining.

applying iron-on woven interface

applying iron-on woven interface