Carding by hand–la technique

3
Millet's Woman Carding Wool

Millet’s Woman Carding Wool

“The purpose of the carding process is to align, thoroughly, all the fibres and to spread them evenly across the carders. This process is essential for the production of a woollen thread and is often employed in preparation for a semi-woollen and semi-worsted yarn.”

—Eileen Chadwick, The Craft of Handspinning

Why use handcards when you can use a drumcarder? Handcards are easily portable and great for blending colours. They are also perfect to make rolags, which are, I believe, the best preparation for longdraw woollen spinning.

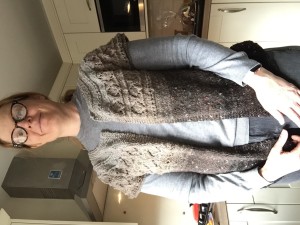
Gradient of natural colours. Carded by hand

Gradient of natural colours. Carded by hand

I like my handcards, especially for making rolags. Yes I could use my drumcarder, but for a recent project where I wanted to achieve a gradient effect for a woollen yarn, I stuck with my handcards. Rolags seemed like the way to go for a nice woollen yarn. Carding up rolags is not particularly time consuming once you get the hang of it. You will quickly get a feel for how many rolags you need to spin a bobbin of singles.

Here’s a short video of me demonstrating how I card.

I’m not saying this is the way. It’s the way I was taught by an experienced guild member and reflects the technique Chadwick described in her book.

A couple of tips for handcarding success:

  • Don’t overload your cards with fiber. Handcards aren’t designed to take big quantities. Go for 5-10 grams at a time.
  • Easy does it, don’t grind your cards together.
  • Don’t worry that all the fiber doesn’t transfer from one card to another. It’s not supposed to.
  • If your forearms get sore, you’re doing it wrong. Stroke one card gently over the other.
  • Check out Eileen Chadwick’s carding how to: pages 33-37 of The Craft of Handspinning.

    finished project!

    finished project!

But is it yarn?

2
Art yarn?

Art yarn?

Ah the allure of Art Yarn. Behold its super-chunky sparkle, its beads, its coils and luscious locks. Resistance is futile. Or is it?

When I started to spin I announced to Sal that all I wanted to make was art yarn. I probably told her I wanted to explore colour and texture. I was making it up.

Sal told me something like this: If you’re ever planning to make anything like a sweater or a wearable garment you should think about making less-arty yarn.

She had a point.

These days I think about hand spun yarn completely differently. What I used to consider art yarn, I now classify as novelty yarn.

Most of the time I’m experimenting with new materials and techniques. I’m spinning to weave or to knit. My use of art yarn is sparse. That’s partly thanks to my fairly boring sartorial habits. Sal tells me that’s a trend now! Yay!

So what about art yarn?

Last month Alison Daykin gave my guild a talk on art yarn (see below). Beforehand I was curious what she would have to say and it got me thinking. What is art yarn? Is it yarn for yarn’s sake? Is it a novelty item? Does anyone actually use it?

I still make a lot of art yarn, but I call it handspun. Like most spinners I’m experimenting with colour, texture and gauge. Most of it isn’t sparkly or bejeweled. The excitement is in the color or the materials.

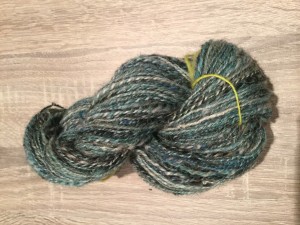
Here’s some sport weight yarn I made for a weaving project.
Blue yarn

Blue yarn

The blue colorway is a combination of natural coloured and dyed fleece.

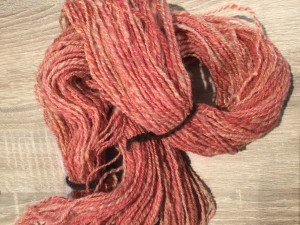
The red is a blend of acid and natural-dyed fleece as well as natural coloured. To me these are rich in colour and texture. I’ve made little aesthetic decisions throughout the making process.
Red yarn

Red yarn

Is it art or is it yarn?

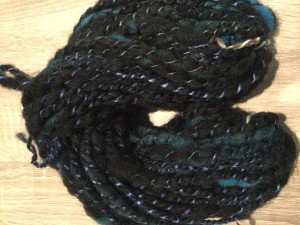
These are some examples of what are more commonly considered to be art yarn. There are the dyed locks, the thick/thin look and some bouclé-like yarn.

Bouclé, sort of
Bouclé, sort of

P

Thick thin

Yarn or art? Both?

Lexi Boeger sees it this way: “I believe the onus is on the buyer to look at the yarn and be able to determine an appropriate project to use it for. This puts more work on the buyer, but ultimately it will make that person also more creative..” (See Spinartiste)

Boeger goes on to say that art yarn can help the knitter (or weaver for that matter) think beyond the pattern and become a designer. My reading of that is: art yarn can be a starting point. It asks the question: what can you make with me?

It’s worth pointing out that Lexi Boeger isn’t making art yarn anymore.
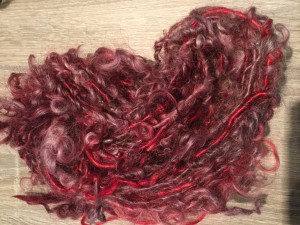
Locks

Locks

JazzTurtle has a long list of patterns that can use art yarn. But to me art yarn is perfect for weaving–especially saori weaving, which is all about experimentation and personal expression. It’s not really concerned with pattern or convention.

This saori-inspired piece uses some art yarn. For me this piece was a big departure from the norm. Here are colours and textures far from my comfort zone. It marks a step in a creative journey, but I’m not sure the path ends at art yarn.
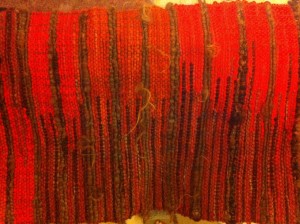
Weaving with art yarn

Weaving with art yarn

[Sal here. I’m going to horn in on your post for a minute]

I would argue that handspinning is technology, and as such there is an intrinsically practical component to the resulting product. Some yarns take a good deal of skill to make well (bouclé for example), or have aesthetic consideration in their colors or textures (as yours do above), and this intersection of technical skill and aesthetic consideration I would call “craft”. Calling something “art yarn” is almost oxymoronic. Yarn for yarn’s sake, as you say, really makes no sense— like building a chair that you can’t sit on. But I know plenty of people who spin and never do anything with the yarn because they don’t knit or crochet or weave, and are perfectly happy that way. I suppose there is a Venn diagram we could make that shows the people who like to build chairs, but don’t actually sit down. I think one could certainly make yarn that’s an end in and of itself, and it could be considered art instead of artisanal, but I think the intention behind it is key, because it would be subverting the concept of yarn. The rest, as you say, is novelty yarn. I’m curious what your guild speaker had to say on the subject. And if they have any good patterns.

[Now back to our regularly scheduled blog post ;)]

Fancy Yarn and permission to spin

When Alison Daykin came down from Derbyshire to talk to the Mid-Essex Guild about art yarn, like Sal I was curious what she had to say about art yarn. One reason for that curiosity was I suspected [knew] many guild members were dubious of art yarn. Many–not all–take the view that art yarn is what you make when first learning to spin. “Don’t worry,” they tell new spinners. “You’ve just made art yarn!” And then everyone laughs.

Alison Daykin described what she makes as fancy yarn, not art yarn. Fancy yarn, Alison explained was any kind of yarn you made that’s non-standard–core spun, bouclé, crepe, thick/thin–that has some irregularity in the making. That irregularity could be introduced in any or all of the steps for making yarn: prepping fiber, color blending, spinning and finishing.

According to Alison, fancy yarn isn’t anything new,  in fact Mabel Ross, author of The Encyclopedia of Handspinning, was an early advocate of fancy yarn.  However, when Alison started spinning in the late 80s/early 90s she felt spinning non-standard or fancy yarn was discouraged. She was taught that the point of spinning was to churn out yards and yards of yarn that looked like it had been made in a mill.

“I wanted to make different yarn and I felt inferior, because I didn’t want to spin plain yarn,” she said. But after taking a course on spinning and dyeing for tapestry weaving from Bobbie Cox, Alison felt she had, “Permission to spin whatever I wanted. Once you know the rules, you can break them.”

Art yarn, Alison said, is a term that grew out of a trend of making yarn out of recycled materials like plastic bags and cassette tape. She did not see the point in putting yarn in a bowl or hanging it up to admire.

“If I can’t use the yarn, then I’ve wasted my time. Use it to make a garment look different. If you use a little yarn in a piece, it can look lovely. Art yarn has got to be practical as well as beautiful,” she added.


Many ways with warps on a rigid heddle loom

2

Getting creative with warp yarns is a great way to make the most out of your rigid heddle loom. Using different coloured and textured yarns in the warp, ordering those yarns in a certain way or not at all will yield different, beautiful results without having to worry too much about pattern.

plain weave plaid

plain weave plaid

Let’s start with texture and colour. In this sample, I used two smooth yarns and two handspun boucle yarns in the warp. From right to left–  black, magenta, then the lighter

boucle and the darker one. For the weft I used the four yarns in the same order to create this nubbly plaid-like sample. Simple to weave, but lots of potential as a cloth. I could easily weave something similar and turn it into a Chanel-style jacket.

Randomly placed many-coloured warp

Randomly placed many-coloured warp

Next up is a piece I wove

recently entirely out of handspun. The plan was to make the warp yarns the feature. I randomly wound the three colours of yarn—pink, purple, green— onto the warping board. On the weft I used a single colour—a grey mohair and wool handspun with a few dollops of green and yellow as a feature. What I like about how this piece turned out is the strong warp colours slightly muted by the greyish weft. Also the slight unevenness of the handspun give the whole piece a subtle speckled effect.

Choosing handspun or many colours of yarn in the warp is one way to use colour and texture in the warp to great effect. A variation on this theme is the multi-coloured warp. Instead of using a few different coloured yarns in the warp, wind on a neutral coloured warp, carefully remove it and then put it the dye pot and apply colour.

Dyed warp

Dyed warp

In this sample, I used a commercial silk warp thread and dyed it with gold, purple, green and a little pink. Woven with a camel/silk handspun, with some saori-style accents, the warp still comes through, but this time with different colour pools.

Dyed warp, Saori-style accents

Dyed warp, Saori-style accents

You could take this technique further and go for an ikat-style weave by tie dyeing the warp or even painting a design onto it, then threading the warp onto the loom. Another approach is to take some self-striping or variegated sock yarn and wind your warp so that the colours sit together. There’s a great description of that technique here.

log cabin weave

log cabin weave

Log cabin weave is a rigid heddle loom classic. It’s simple, just alternating blocks of light and dark yarns (LDLDLDLD DLDLDLDL etc) in the warp and then weaving the same way. More about log cabin in my November post.

Using multi-coloured handspun or variegated sock yarns that have less contrast also create a nice effect. Check out this blog post on this variation on log cabin weave. I’ve also seen log cabin done with some saori-style embellishments that look fantastic.

One last technique that emphasizes warp is using the variable dent rigid heddle reed. It’s a reed that allows you to mix up the dent sizes in the reed to then use different weights of yarn. I haven’t tried out this tool myself, but apparently one of the effects you can achieve is a ribbed fabric.

All these techniques bring a lot of interest and texture without having to mess around with pick up sticks. Don’t get me wrong, pick up sticks are great, but don’t think you need to use them to get the most out of your rigid heddle loom.

Some resources for rigid heddle weaving:

Ravelry’s rigid heddle weaving group

Schacht spindle blog

Weavezine

Turning handwoven fabric into a garment

12
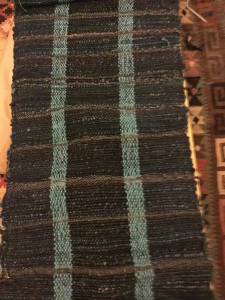
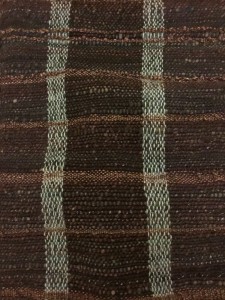
Handwoven awaiting transformation

Handwoven awaiting transformation

Rigid heddle looms may not be fancy or complicated, but do not be deceived. You’re not going to weave acres of jacquard, but don’t think placemats, table runners, scarves and hand towels are your only options on a rigid heddle loom.

Two years ago when I bought my little loom I had no idea that with some experimentation, practice and patience I’d be able to make a garment from fabric I’d created. For one thing, the idea of cutting my handwoven cloth terrified me. Also as relatively inexperienced seamstress, I wasn’t confident I could create a wearable garment.

I took the small amount of fabric I’d woven on a 20″ (50 cm) Ashford Knitter’s Loom up to Clacton-on-Sea for a lesson in sewing with handwoven with Sarah Howard. Sarah, along with Elisabeth Kendrick, is the author of Get Weaving, which I blogged about earlier this year.

Sarah helped me find a pattern that would work with the 175cm of fabric I had. We used a commercial paper pattern to get an idea of size and shape and then made some modifications for fit and the fabric.

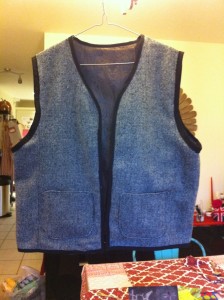
The next step was to make a paper pattern to use to then sew up a calico to see how the garment looked. I used some denim for the calico. It allowed me to see where changes were required (in the armpits!). Once that was done, I went a way with instructions to test out the pattern on store-bought fabric. Sarah says it’s important to do a trial run before diving into your handwoven. Lots of issues can be sorted out on the sample piece. For example, I found I needed to change the shape of the side pieces slightly. Making a sample made me think about bias binding and lining too.

sample garment

sample garment

My sample looked pretty good, but I realised I would have to do the pockets a bit differently on the final piece–ie with biased binding and the fabric backed by iron-on woven interfacing. I also decided that gold/black lining would not look good with the handwoven and went for a solid blue silk.

Here’s a couple things to keep in mind when you’re placing your pattern on your handwoven:

– Make sure all the pieces fit. Measure the length of fabric without the fringe.

– Think about the best use of your fabric’s selvedges and hemmed ends to reduce the potential for fraying and binding.

– Make a note of the direction of warp and weft in your fabric. How does that influence how you place your pattern on your fabric? You probably want all your pieces going with the warp.

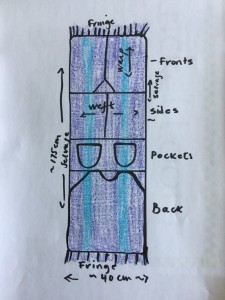
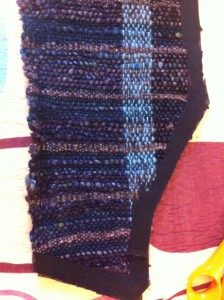
My layout looked like this:

layout

layout

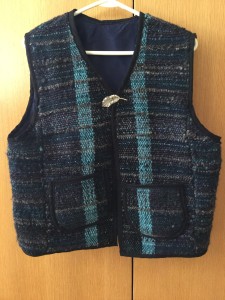
I was careful to place the pockets to match up with the stripes on the two front pieces.

The next step was to cut out the pieces.Once I did, I carefully applied strips of iron-on woven interfacing to the fabric to prevent fraying. Then I zig-zag stitched over that.

I sewed together the fabric pieces as well as the lining. I didn’t sew in the lining, but bound the piece together all at once with bias-binding tape. I made it myself, which wasn’t difficult, but it was time consuming. However, store-bought bias tape is pretty poor so I do recommend taking the time to make it yourself.

Et voila! Garment!

finished garment!

finished garment!

A few things to keep in mind when sewing with handwoven.

– Remember your woven fabric may be quite thick. How is that going to impact your seams? Will your garment work well with chunky seams?

– Use iron-on woven interface to prevent fraying. It also makes it easier to sew.

– Go slow! Once you machine sew handwoven fabric, it’s really hard if not impossible to pick out without destroying the fabric.

– Handwoven is stretchy. Think about how that might cause difficulties when sewing up or when putting in a lining.

applying iron-on woven interface

applying iron-on woven interface

Plain weave & pick up sticks on the rigid heddle loom

0

The stormy weather and holiday break gave me the chance to do some weaving. Finally.

I’ve taken possession (temporarily) of my guild’s 30 cm Ashford knitter’s loom. I had all these crazy ideas about making wider fabric and then cutting and sewing it into a vest like this one from Purl Soho: Quilted Vest. Whether I take the plunge and cut my fabric and sew it into a garment will depend on how brave I’m feeling.

Freestyling stash buster plain weave

Freestyling stash buster plain weave

For this project, I used commercial yarn for the warp and a variety of handspun from my stash in the weft. It’s either Ryeland or BFL and there is some silk in there too. There is also some yarn I spun from a luscious combination of camel/seacell/faux cashmere from HilltopCloud

Honestly there was no real plan for warping. I decided how long I needed the warp to be and how wide and then made do with the yarn I had. I used a navy silk/wool, alpaca (turquoise) and some black super wash–all picked for sturdiness.

Similarly there was no plan for weaving–except I wanted to use as much of my yarn as possible! (There’s still a little left.) The only somewhat fancy technique I used was to make little loops by randomly picking up the weft with a long knitting needle, packing the weft with the reed and then pulling out the needle.

If I’m brave this cloth could become a fancy vest. If I play it safe, it will be a cosy wrap.

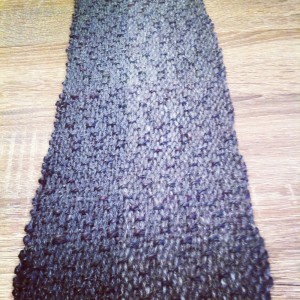
I wove my second project on my own 15″ Cricket loom. I used hand spun suri alpaca for the warp and some of the left over camel/silk for the weft. This technique is called faux twill, which is described by Jeen in the rigid heddle looms group on Ravelry. I’ve been wearing this project as a scarf.

Faux twill and fabulous

Faux twill and fabulous

The third project was also woven on my Cricket loom. I used commercial yarns from my stash. The warp is a champagne chenille and the weft is Noro silk/cotton sock yarn and Brown Sheep chunky in a mossy green. Nice right?

Honeycomb

Honeycomb

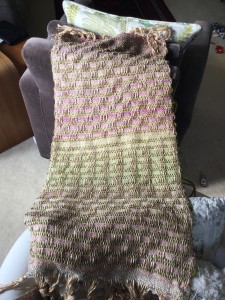
I used a pick up stick to achieve this honeycomb pattern described in Jane Patrick’s The Weaver’s Idea Book, published by Interweave. This book is invaluable for RHL newbies like me who want to push themselves and try out many different patterns and techniques. Indeed the rigid heddle loom group on Ravelry has a thread devoted to those weavers working their way through the book. Check it out!

Learning: I want to try out the guild’s four-shaft table loom!